
 ES
ES  EN
EN  DE
DE  NL
NL  FR
FR  PT
PT  IT
IT  JA
JA WPForms Keap Integration: Connect WPForms to Keap CRM (Free)
WPForms does not include a native Keap add-on at any license tier, including Elite. Sending WPForms entries to Keap therefore requires a connecting layer.
Zapier can do it, but it runs outside WordPress on a task-metered plan. Bit Integrations connects the two directly within WordPress, with WPForms as a free trigger and Keap as a free action.
TL;DR
- WPForms does not offer a Keap integration, even on the Elite plan. To connect them, you need another tool in between.
- Zapier can connect WPForms with Keap, but it requires a WPForms Pro+ plan and a separate Zapier subscription for higher usage.
- Bit Integrations lets you connect WPForms to Keap directly from your WordPress dashboard. WPForms works as a free trigger, and Keap is available as a free action.
- The setup only requires your Keap Client ID, Client Secret, and field mapping. You can complete it in around 10 minutes.
Does WPForms have a native Keap (Infusionsoft) integration?
No. The WPForms add-on library includes several CRM and email marketing platforms at the Pro and Elite license levels, but Keap is not one of them. Upgrading to Elite does not unlock a Keap add-on, because no such add-on exists.
Keap was previously called Infusionsoft. The rename does not change anything on the WordPress side: the same account, the same API credentials, and the same setup apply regardless of which name you searched for.
Because there is no first-party add-on, every working method routes WPForms data through a third layer. The rest of this guide covers what those layers are and how to set up the WordPress-native one.
Ways to connect WPForms to Keap
Four approaches exist. They differ mainly in where the automation runs and what happens as your submission volume grows.
| Método | Donde se ejecuta | Cost model | Main constraint |
|---|---|---|---|
| Zapier with the WPForms Zapier add-on | Zapier servers, outside WordPress | WPForms Pro or higher, plus a Zapier plan | The free Zapier tier allows 100 tasks per month and limits each Zap to two steps: one trigger and one action. |
| Keap Official Opt-in Forms | WordPress | Gratis | Builds its own Keap opt-in forms. It does not receive submissions from WPForms. |
| Single-purpose Keap form plugins | WordPress | Free tier with a paid upgrade | Free tiers commonly restrict field mapping to basic contact fields such as email and first name. |
| Bit Integrations | WordPress | Free version covers this pairing; paid tier for wider access | WPForms is one of the free trigger plugins, and Keap is one of the free actions, so no task metering applies. |
This guide stays on setup rather than pricing. For a wider look at how these routes compare on cost, field depth, and long-term maintenance, read the breakdown of WPForms CRM integration methods for WordPress.
What you need before you start
- WPForms installed, with at least one published form. Bit Integrations reads WPForms submissions directly, so a paid WPForms license is not required for this method.
- Bit Integrations, free version, installed and activated.
- An active Keap account with permission to create contacts.
- A Keap Client ID and Client Secret.
Where the Keap Client ID and Client Secret come from
Keap does not expose a single ready-made API key in the main account settings. The Client ID and Client Secret are generated by registering an application in the Keap developer area, then enabling API access on that application.
Bit Integrations also displays a homepage URL and a callback/redirect URL on its Keap connection screen. Both values must be registered on the Keap application before authorization completes. The full walkthrough, including where each field lives in the Keap interface, is in the Bit Integrations documentation for the Keap action.
Copy, do not retype. The callback/redirect URL has to match on both sides exactly. Copy it from the Bit Integrations connection screen using the copy button next to the field rather than typing it by hand. A mismatch here is the most common reason authorization fails on the first attempt.
How to Create WPForms Keap Integration with Bit Integrations
The setup below uses only the free version of Bit Integrations. It takes around ten minutes, most of which is spent generating the Keap credentials.
Paso 1: Instalar y activar Bit Integrations
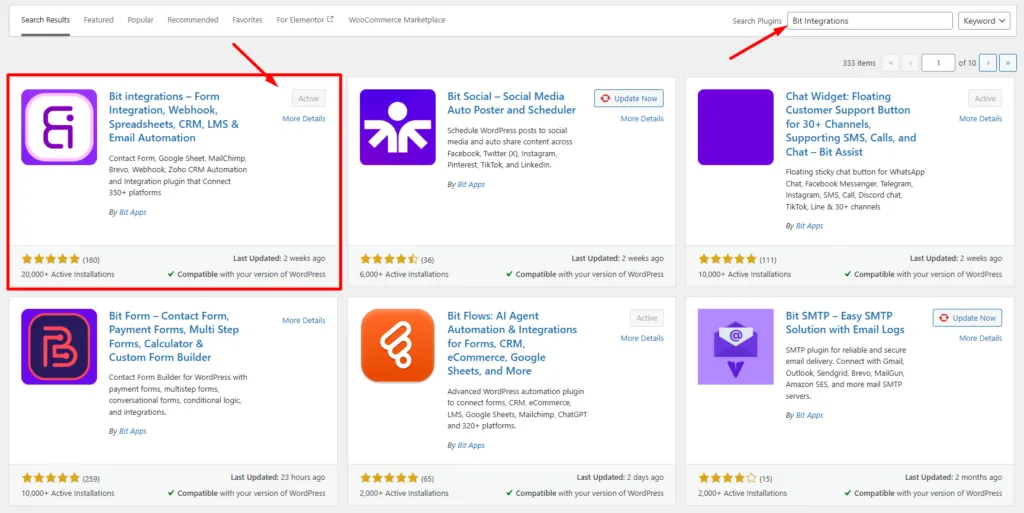
In your WordPress dashboard, go to Plugins, then Add New, and search for Bit Integrations. Install the plugin and activate it.
Paso 2: Crea una nueva integración
Open the Bit Integrations dashboard and click Crear integración. Esto abre la pantalla de selección de disparadores.

Step 3: Select WPForms as the trigger.
Type WPForms into the desencadenar search box and select it. The trigger is the event that starts the automation; in this case, a form submission.

Step 4: Choose the form you want to connect.
Pick the specific WPForms form whose entries should reach Keap, then click Next. Each form needs its own integration, which is what lets you send different forms to different Keap outcomes.

Step 5: Select Keap as the action.
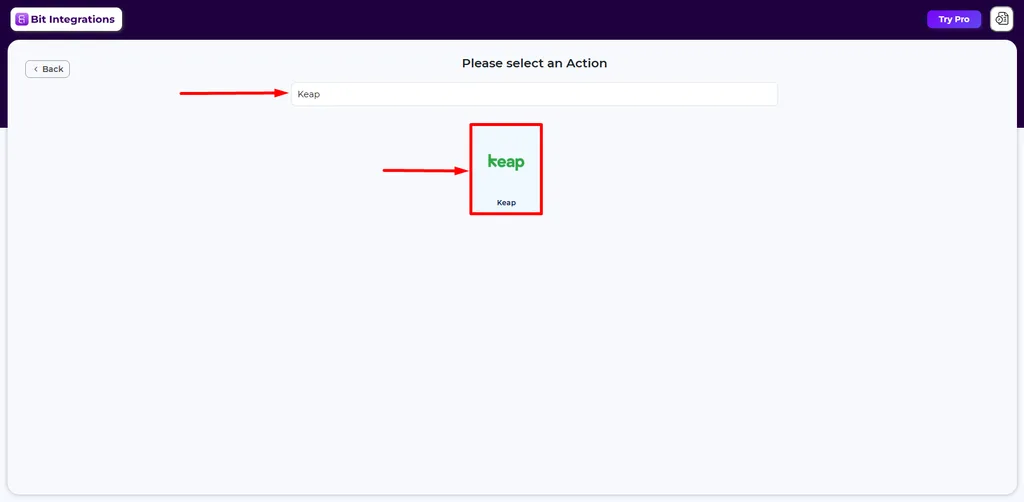
On the action selection screen, search for Keap and select it. The action is what happens when the form is submitted.
Step 6: Authorize your Keap account.
Give the connection a name, then paste your Keap Client ID and Client Secret into the matching fields and click Authorize.
Keap will ask you to grant access, then return you to WordPress with the connection saved. Click Next once authorization succeeds.
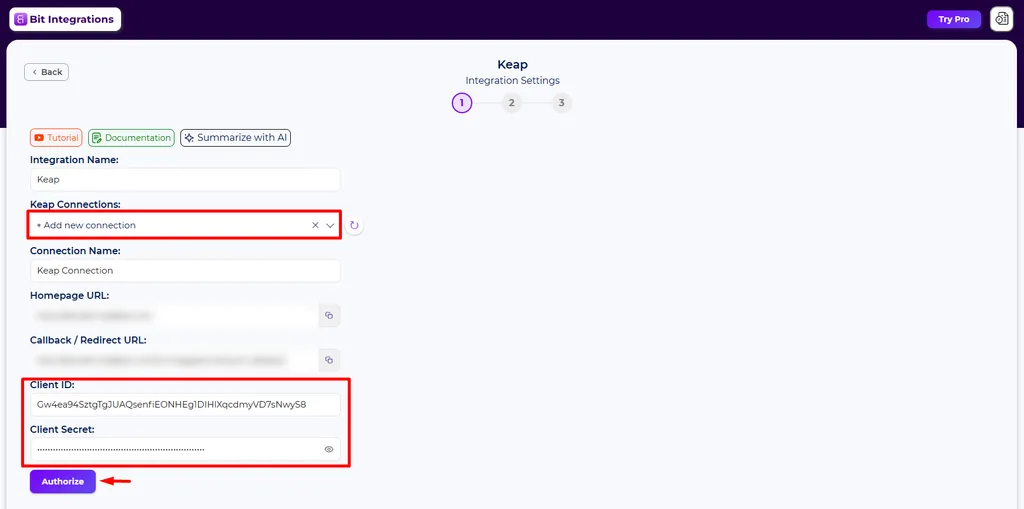
Saved connections are reusable. Once a Keap account is authorized, any other integration you build on the same site can select it from the Keap Connections dropdown instead of repeating this step.
Step 7: Choose the Keap action event.
Select the action event you want the form submission to perform. The available event is Create a Contact, which adds the submitter to your Keap contact list.
Step 8: Map WPForms fields to Keap fields
Match each WPForms field to the Keap field it should populate, then click Next to save the integration. Field mapping is covered in more detail in the next section.
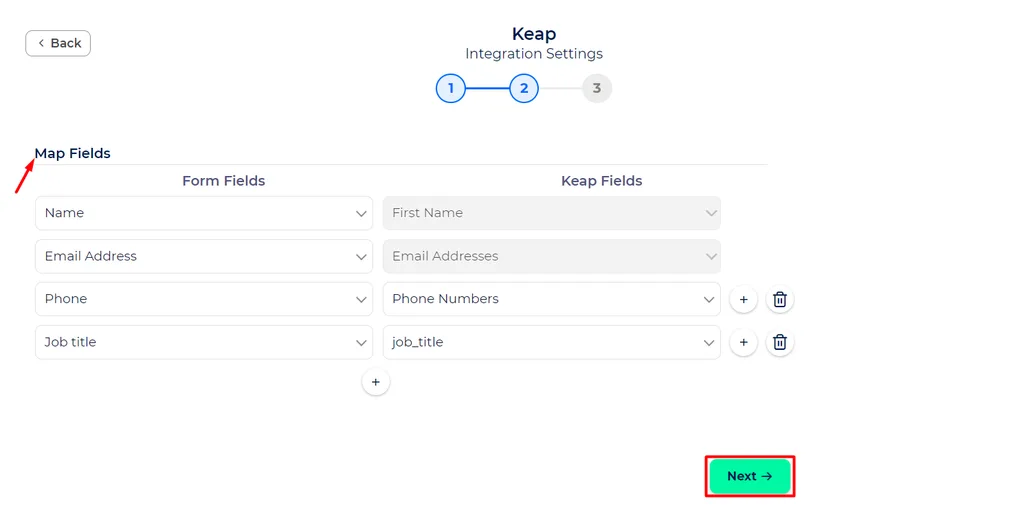
Below the mapping panel, you will find an Actions area containing Add Tags and Conditional Logic. Both are optional, and both are covered further down.

Step 9: Test the integration
Submit a test entry through the live form, then open Keap and confirm the contact was created with the values you mapped.
Testing with a real submission rather than a preview is important because the integration listens for the actual WPForms submission event.

Mapping WPForms fields to Keap contact fields
Field mapping is where most Keap integrations either work cleanly or quietly lose data. The table below covers the fields that appear on almost every lead form.
| WPForms field | Keap field | What to watch for |
|---|---|---|
| Nombre | First Name | If your WPForms Name field is set to Simple, the entire name lands in First Name. Switch the field to the first and last format so each part maps separately. |
| Name (Last) | Last Name | Optional, but worth mapping. Keap record matching and personalized email merge fields both work better with a surname present. |
| Correo electrónico | Email Addresses | Keap stores several email addresses per contact. The mapped value fills the primary slot. |
| Teléfono | Phone Numbers | Send digits with a country code where possible. Heavily formatted values can be rejected or stored in a way that breaks later SMS automation. |
| Single-line text, dropdown, radio | Custom fields such as job_title | Custom fields appear in the Keap Fields dropdown under their API name, not the label you see in the Keap interface. Confirm the name before mapping. |
Required fields. First Name and Email Address appear as fixed rows on the mapping screen because Keap needs them to create a contact. Leaving either unmapped causes Keap to reject the request, and the run is recorded as a failure rather than silently passing.
If you plan to route the same form to more than one destination, for example, a CRM and a mailing list, the same mapping principles apply across every action.
En guide to automating WPForms entries in WordPress covers building multi-action workflows from a single form.
Conclusión
WPForms captures the lead, and Keap works it. The gap between them is a missing add-on, not a technical limitation, and it closes inside WordPress: WPForms fires the trigger, Keap creates the contact, and the free tier covers this pairing with no monthly task allowance.
If Keap is one of several tools you want your forms feeding, there are also guides to free email marketing tools that connect with WPForms and a full listing of platforms WPForms can connect to through Bit Integrations.
Preguntas frecuentes
Can I connect more than one WPForms form to Keap?
Yes. Create a separate integration for each form and reuse the saved Keap connection. The same approach extends to other destinations, which you can browse in the overview of WPForms integrations available in WordPress.
Does WPForms have a Keap add-on?
No. There is no Keap add-on in the WPForms add-on library at any license level, including Elite. Connecting the two requires either Zapier or a WordPress integration plugin.
Can I connect WPForms to Keap without Zapier?
Yes. Bit Integrations runs the connection inside WordPress, so form submissions go straight from your site to the Keap API without passing through an external automation platform or consuming monthly tasks.
Do I need WPForms Pro?
Not for this method. The WPForms Zapier add-on requires a WPForms Pro license or higher, but the Bit Integrations WPForms trigger reads submissions directly and works with the free version of WPForms.
Is there a limit on how many submissions get sent to Keap?
Bit Integrations does not meter runs, so there is no monthly task allowance to exhaust. Keap enforces its own API rate limits on the receiving side, which high-volume sites should account for.

Blog relacionado

Webhooks en Bit Integrations: se acabaron las limitaciones de la plataforma

Envía los datos del formulario de inicio de sesión/registro de Essential Addons a cualquier plataforma que utilices