EN
EN  ES
ES  DE
DE  NL
NL  FR
FR  PT
PT  IT
IT  JA
JA Gravity Forms Trello Integration Without Gravity Forms Pro (Save $100+)
If you’re a Gravity Forms Basic plan user ($59) and you want to connect Gravity Forms with Trello, it is not possible out of the box. To unlock that integration, you’d need to upgrade to the Pro plan ($159) or Elite plan ($259), which is an extra $100 or $200, just for one integration.
What if I tell you that with Bit Integrations Single Site, priced at just $35/year, you can connect Gravity Forms to Trello? And it doesn’t stop there. Bit Integrations lets you connect Gravity Forms with 374+ platforms, including Google Sheets, ActiveCampaign, Mailchimp, virtually any CRM, task automation tools, membership platforms, WooCommerce, and more.
TL;DR: Connect Gravity Forms to Trello Without Upgrading
Gravity Forms Basic ($59/year) doesn’t include native Trello integration — connecting the two normally requires upgrading to Gravity Forms Pro ($159/year), an extra $100+ just for one integration.
Bit Integrations Single Site ($35/year) solves this without any Gravity Forms plan upgrade. It connects Gravity Forms to Trello directly, plus 374+ other platforms, including Google Sheets, ActiveCampaign, Mailchimp, WooCommerce, CRMs, membership platforms, and task automation tools.
Key takeaways:
- Bit Integrations supports 374+ platform integrations beyond Trello.
- Gravity Forms Basic ($59) has no native Trello integration
- Gravity Forms Pro ($159) unlocks it but costs $100+ more
- Bit Integrations Single Site ($35/year) connects Gravity Forms + Trello without upgrading
Table of Contents
What upgrading actually costs
Here’s the pricing as it stands today:
- Basic: $59/year (1 site)
- Pro: $159/year (3 sites), includes the native Trello add-on
- Elite: $259/year (unlimited sites)
So upgrading Gravity Forms solely to reach Trello means an extra $100-$200 per year, mostly for a single feature. If Trello is the main thing you’re after, that’s a steep jump.
The most affordable option: Gravity Forms Basic + Bit Integrations
Bit Integrations is an automation plugin that connects Gravity Forms to Trello and 374+ other apps, no matter which Gravity Forms tier you’re on. You keep your $59 Basic license and add the integration layer separately.
A lot of people are on Basic, already happy with their forms, and just need entries to flow into the tools they already use, whether that’s sending submissions to a CRM, logging entries in Google Sheets, or adding subscribers to an email marketing platform, without being pushed up a pricing tier for each one.
In fact, you can connect Gravity Forms to all of these without upgrading your plan. It runs on your own site, and talks to Trello directly through your own API key, so your form data isn’t routed through a separate middleman service.
Cost comparison: native upgrade vs. Bit Integrations
Staying on Basic and adding Bit Integrations saves you $65-$165/year compared with upgrading Gravity Forms for the native Trello add-on.
| Path to Trello | Yearly cost | Difference vs. Bit Integrations (Your save) |
|---|---|---|
| Gravity Forms Basic + Bit Integrations Basic | $59 + $35 = $94 | Baseline |
| Gravity Forms Pro (native Trello add-on) | $159 | + $65/year |
| Gravity Forms Elite (native Trello add-on) | $259 | + $165/year |
How to connect Gravity Forms to Trello with Bit Integrations
The whole setup is six steps. Setting up the Trello API key takes a couple of extra clicks, so I’ve spelled it out below.
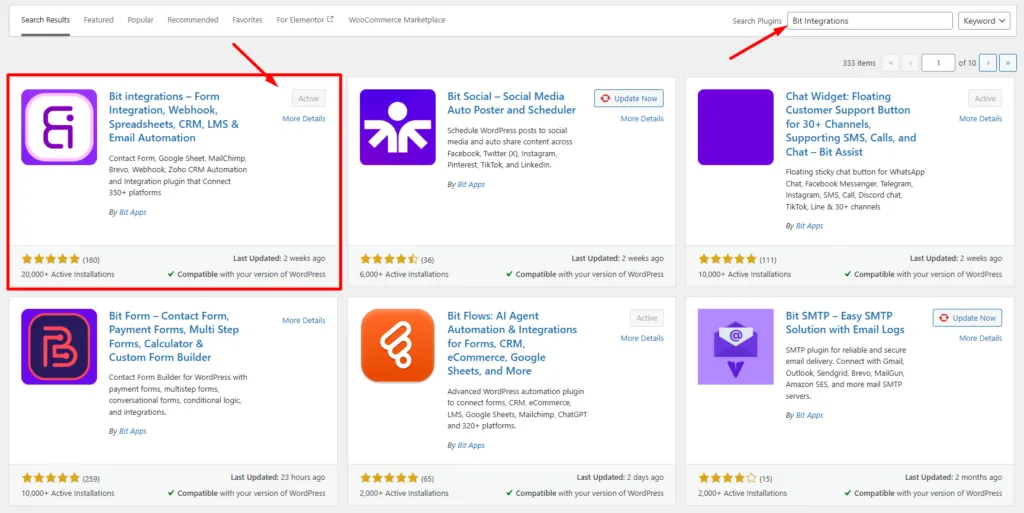
Step 1: Install and activate Bit Integrations
In your WordPress dashboard, go to Plugins → Add New, search for “Bit Integrations,” then install and activate it.
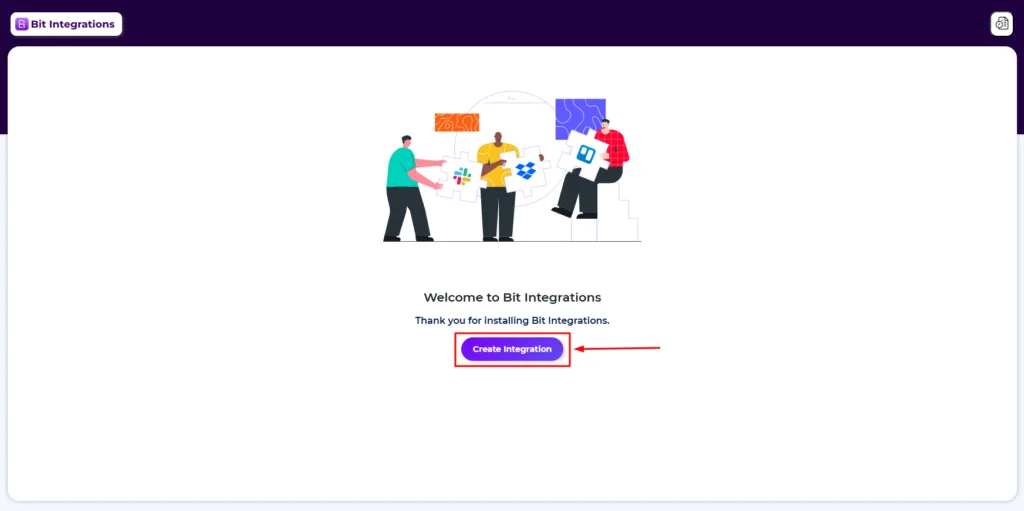
Step 2: Create a new integration
Open Bit Integrations and click Create Integration to start a new flow.
Step 3: Choose Gravity Forms as your trigger
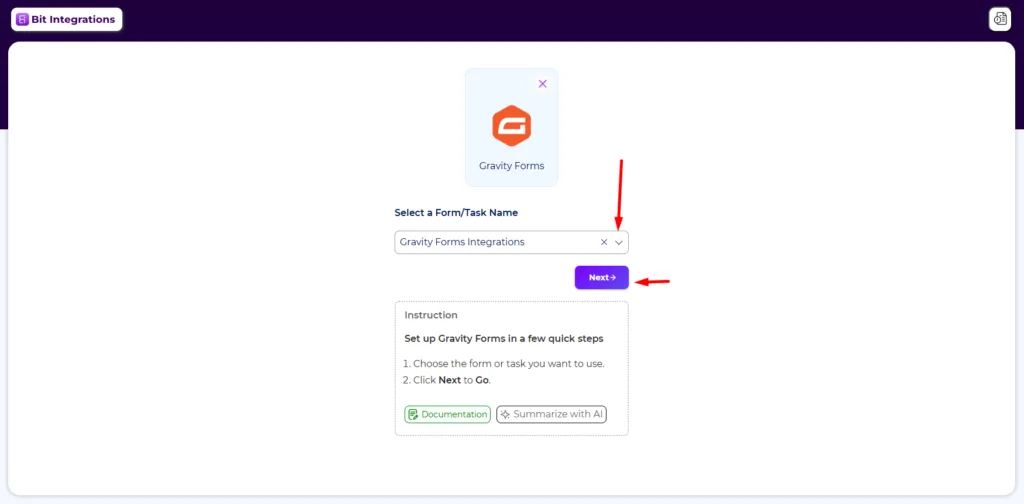
In the trigger menu, search for and select Gravity Forms. Then pick the specific form you want to connect to Trello and click Next.
Step 4: Choose Trello as your action
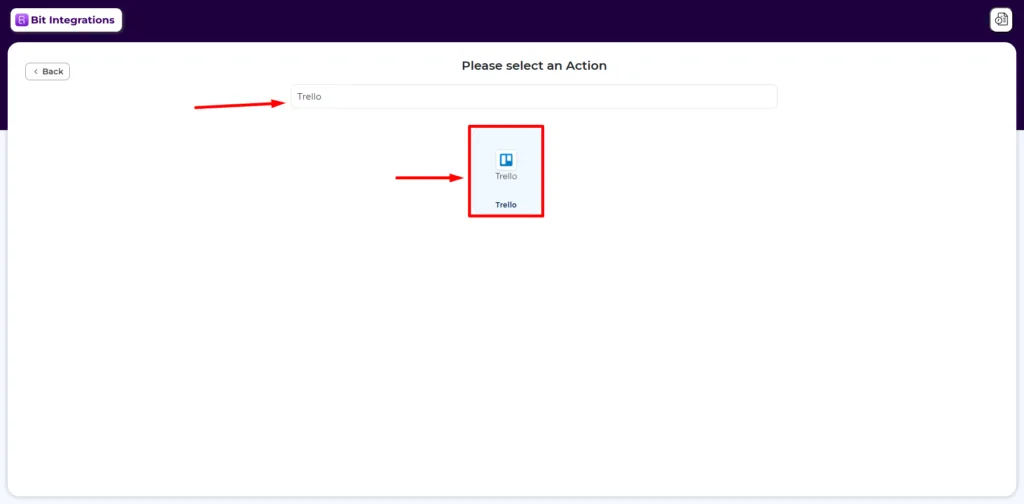
You are in the action menu; search for and select Trello.
Step 5: Authorize your Trello account
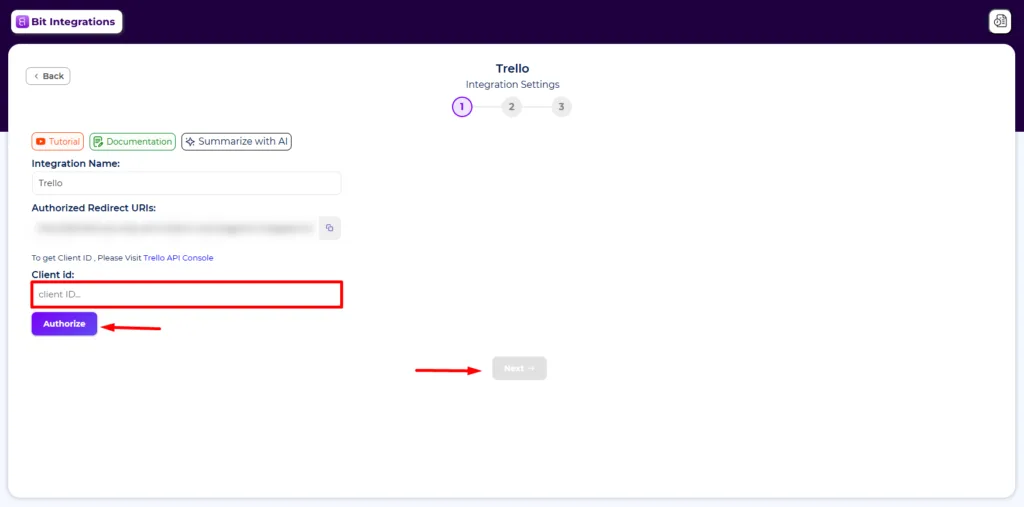
This is where you connect Trello using an API key. First, copy the Authorized Redirect URL shown on this screen; you’ll need it in a moment. Keep this tab open.
How to create your Trello API key
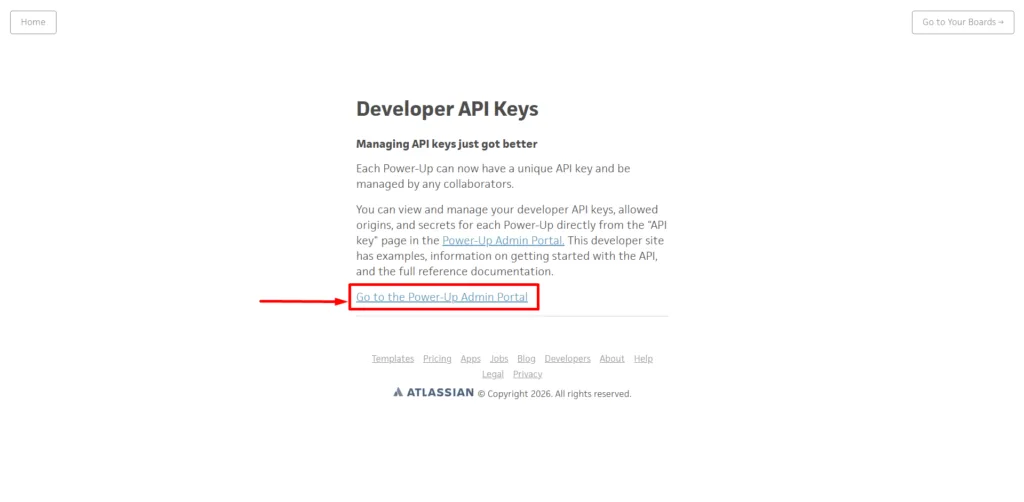
A. Go to the Trello API console and click Go to the Power-Up Admin Portal. For more details checkout the official documentation of Trello Integration.
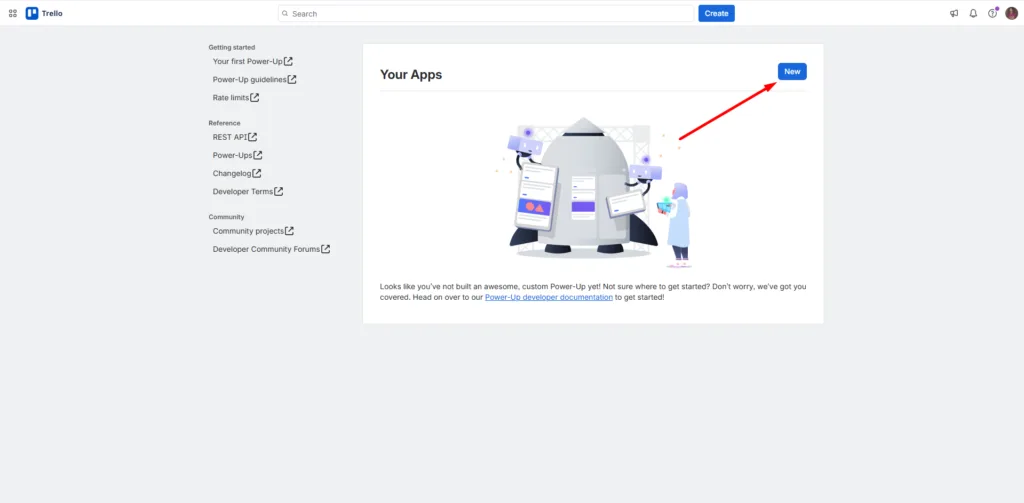
B. Click New to create a new app.
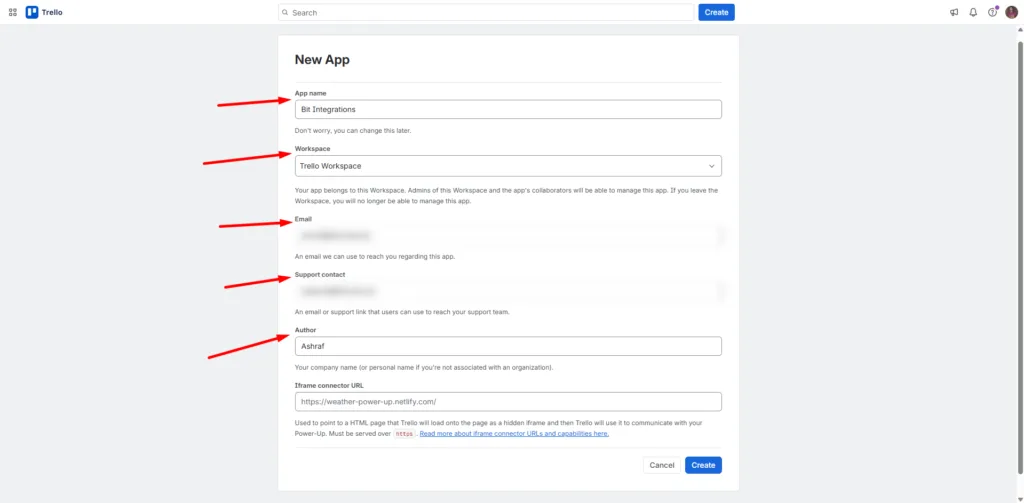
C. Enter an app name, choose your workspace, and add your site email, support email, and author name. Leave the Iframe Connector URL field blank. Then click Create.
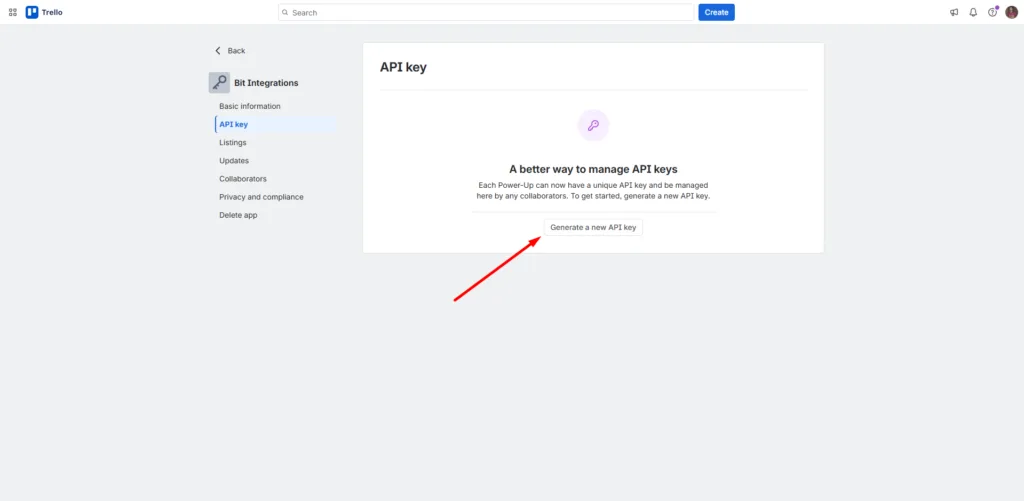
D. Open the API key tab and click Generate a new API key.
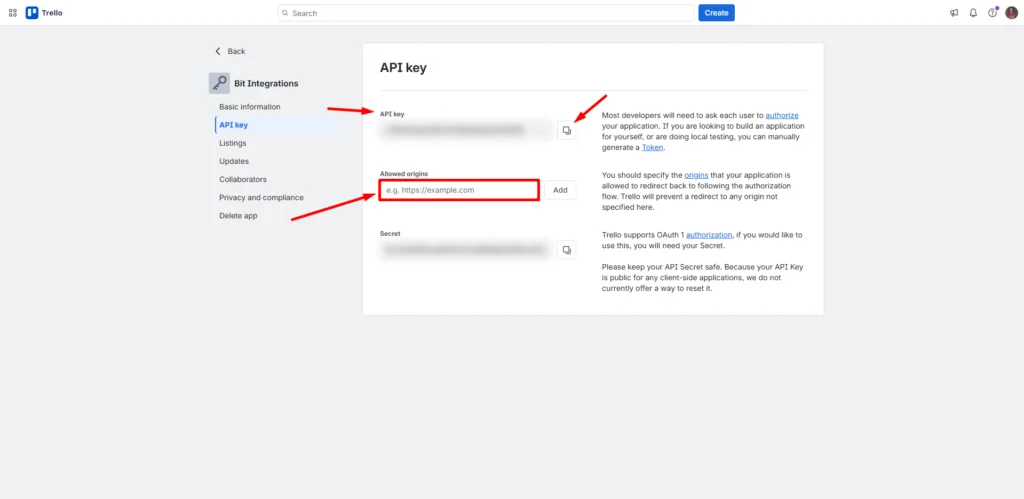
E. In the Allowed Origins box, paste the Authorized Redirect URL you copied in Step 5 and click Add. Then copy the API key. That’s the key you’ll use to authorize Trello in Bit Integrations.
Back in Bit Integrations, paste the key, click Authorize, and click Next.
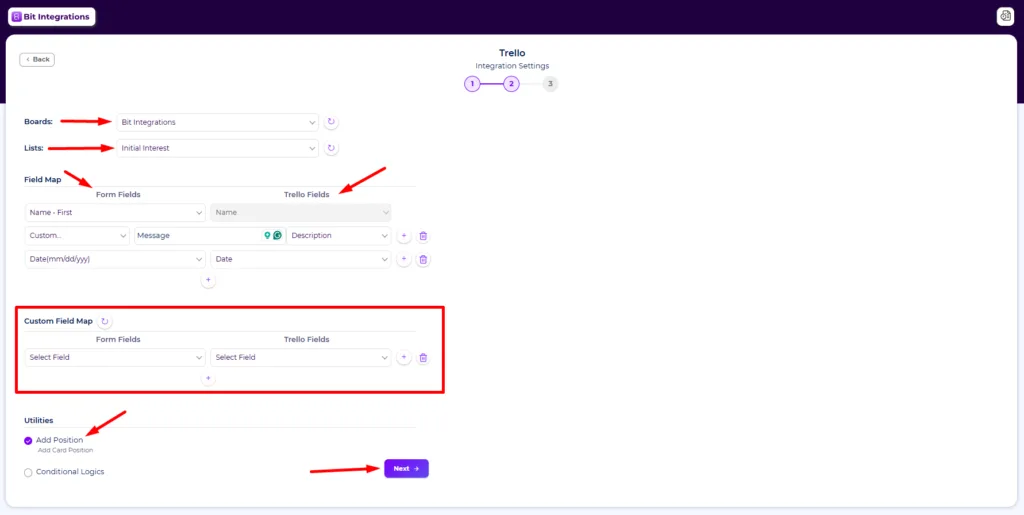
Step 6: Pick your board, list, and map your fields
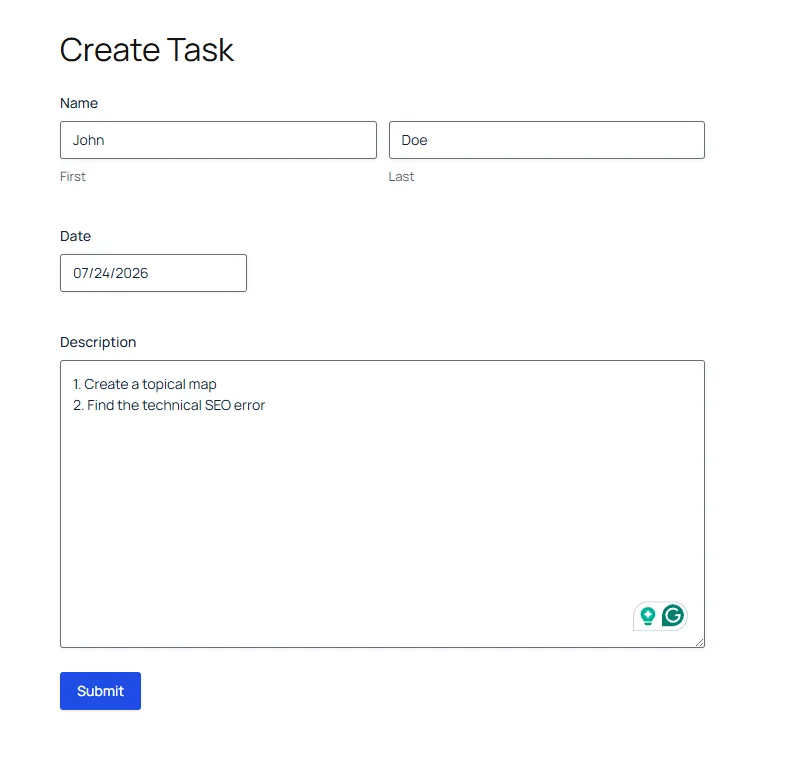
Choose the Trello board and list where cards should be created. Then map your Gravity Forms fields to the matching Trello card fields, for example, name → card name, message → description, date → due date.
If your board uses Trello custom fields, map those under Custom Field Map. You can also set whether new cards go to the top or bottom of the list, and add conditional logic so cards are only created when a submission meets your rules.
Click Next to save and finish the integration.
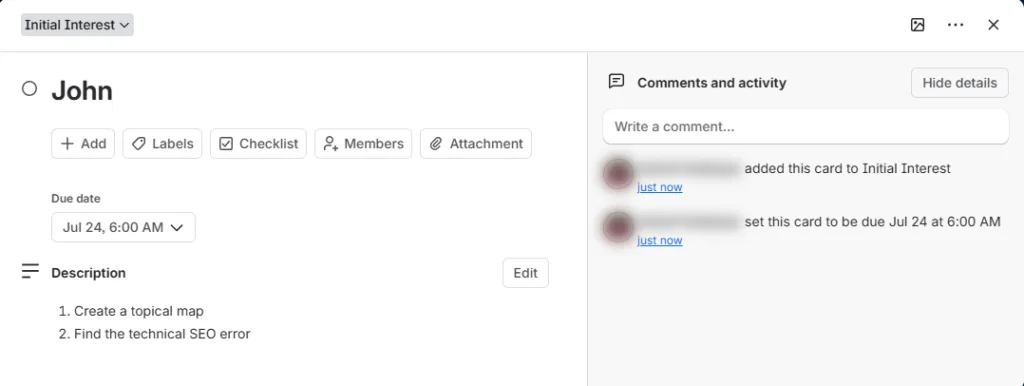
That’s it. Submit a test entry on your form, and the data appears as a new Trello card.
Form submission added successfully in Trello initial list
What you can actually send to Trello
Once it’s connected, each form submission can create a Trello card with:
- Card name and description, mapped from any form fields
- A due date pulled from a form date field
- Custom field values, if your board uses Trello custom fields
- Card position, top or bottom of the list
- Conditional rules, so a card is only created when a submission meets your criteria (for example, a specific dropdown value)
The flow runs one way, from your form into Trello. This covers the most common need: turning submissions into actionable cards. To connect several forms or boards, just create a separate integration for each pairing.
Conclusion
If Trello is the main reason you’re considering a Gravity Forms upgrade, it’s worth knowing you have options. Upgrading to Pro or Elite unlocks the native Trello add-on but raises your yearly cost to $159-$259.
Staying on the Basic plan and using Bit Integrations keeps you on your existing $59 license and $35 for Bit Integrations, and the total cost is $94/yearly and the setup takes only a few minutes.
Which route makes sense depends on what you need: if you’ll use other Pro or Elite features, upgrading may be worthwhile on its own. If Trello (or a handful of other integrations) is all you’re after, a connector lets you add that without changing your plan.
Frequently Asked Questions
Do I need Gravity Forms Pro or Elite for this?
No. Bit Integrations works with the Basic license and every tier above it. That’s the whole point: you get Trello without the upgrade.
What Trello credentials does Bit Integrations use: an API key, a token, or both?
You provide the API key from your Trello Power-Up app, and Bit Integrations then runs Trello’s OAuth authorization to get the access token on your behalf. That’s why you paste the Authorized Redirect URL into the “Allowed Origins” field during setup. Trello blocks the auth redirect for any origin you haven’t whitelisted.
Which Trello card fields can I map form data to?
The standard card fields: name, description, and due date, plus card position (top or bottom of the list). Board and list are selected once for the whole integration rather than mapped per submission.
Can I map Gravity Forms fields to Trello custom fields?
Yes, that’s what the separate “Custom Field Map” section is for. Note that Trello custom fields are themselves a Power-Up, so the fields you want to target need to already exist on that board before they’ll show up in the mapping dropdown.
How do multi-value fields like checkboxes and multi-selects get sent?
Multi-value inputs are passed as combined text into whichever card field you map them to (for example, into the description). If you need them cleanly separated, map them to their own custom field or split them across fields rather than dumping everything into one.
Can one form create cards on different boards or lists depending on the submission?
A single integration writes to one board and list. To route submissions to different destinations, create a separate integration per destination and use conditional logic on each so it only fires when its condition is met.
Is the integration one-way or two-way?
It’s one-way: form submissions create and populate Trello cards. It doesn’t pull Trello changes back into your form.

Related Blog

Top 10 ClickUp & Asana integrations for WordPress + Setup Guide

Webhooks in Bit Integrations: No More Platform Limitations