

 EN
EN  ES
ES  DE
DE  NL
NL  FR
FR  PT
PT  IT
IT  JA
JA Best Gravity Forms Copper CRM Integration tools in 2026
Direct Answer
You can connect Gravity Forms to Copper CRM in three ways. All three need a Copper plan with API access (trial, Professional, or Business; Basic will not work). Pick what you need:
- Outfunnel: best for contact matching, web tracking, and lead scoring. Billed monthly by active contacts.
- Gravity Extra: best for one dedicated form-to-Copper connection. One-time purchase, priced by site.
- Bit Integrations: best for multiple Copper record types or wider WordPress automation. It doesn’t just connect Gravity Forms with Copper CRM, it also lets you build unlimited integrations and automation flows between more than hundreds of apps without requiring extra add-ons, per-integration fees, or coding. Annual or lifetime license available, priced by site.
If your business relies on Gravity Forms to collect leads and Copper CRM to manage customer relationships, connecting the two can eliminate hours of manual data entry while ensuring every lead reaches your sales team instantly. Whether you’re capturing contact requests, demo bookings, or support inquiries, a reliable integration keeps your CRM updated automatically and reduces the risk of missed opportunities.
While there are several ways to connect Gravity Forms with Copper CRM, not every solution offers the same balance of features, flexibility, and pricing. Some tools focus solely on syncing Gravity Forms with Copper, while others provide a broader automation platform that can connect hundreds of apps and workflows from a single dashboard.
In this guide, we’ll compare three of the best Gravity Forms Copper CRM integration tools in 2026—Outfunnel, Gravity Extra, and Bit Integrations—breaking down their features, pricing, ease of use, and which type of user each solution is best suited for.
The Copper plan requirement (read this once)
All three methods depend on Copper features that are gated by plan. Copper documents Developer API access on its trial, Professional, and Business plans.
The free trial grants temporary access to Professional and Business-level features, including the API, which is how this article’s Bit Integrations test ran on a Business-plan trial.
Copper Basic and Starter do not include API access. Copper separately lists the Outfunnel connector as available on Professional and Business only.
Buying Outfunnel, Gravity Extra, or Bit Integrations does not add the integration to a Copper Basic account. Because this rule governs every method below, it is stated here once instead of being repeated in each section.
Sources from: Copper plan comparison | Copper API documentation | Copper Gravity Forms listing
Let’s compare the three methods
This table compares the methods by plan eligibility, payment model, supported record types, conditional logic, tracking, and best fit.
| Criteria | Outfunnel | Gravity Extra | Bit Integrations |
|---|---|---|---|
| Connector type | Third-party SaaS listed in Copper’s marketplace | Dedicated Gravity Forms add-on | WordPress automation plugin |
| Copper plan needed | Professional or Business, plus a separate Outfunnel account | Professional or Business for API access | Professional or Business for API access |
| Payment model | Separate monthly subscription | One-time purchase | Both Annual or lifetime license |
| Main Copper records | Creates or updates contacts | People, leads, tasks, and supported modules | Company, Person, Opportunity, and Task |
| Conditional logic | Not clearly documented per submission | Yes | Yes |
| Submission history | Logged on the Copper contact timeline | Feed-based processing | Success and error timeline in WordPress |
| Web tracking | Yes | No documented visitor tracking | No built-in visitor tracking for this action |
| Pricing basis | Active contacts | Per site license (1 to 10 sites) | Per license tier (1 site or unlimited) |
| Best suited to | Sales and marketing context around contacts | A single focused connection | Wider WordPress automation |
Outfunnel emphasizes contact syncing and engagement context. Gravity Extra is a purpose-built connector for one job. Bit Integrations supports more Copper action types and a broader WordPress automation stack.
Method 1: The Copper marketplace integration by Outfunnel
Is this a native Copper integration?
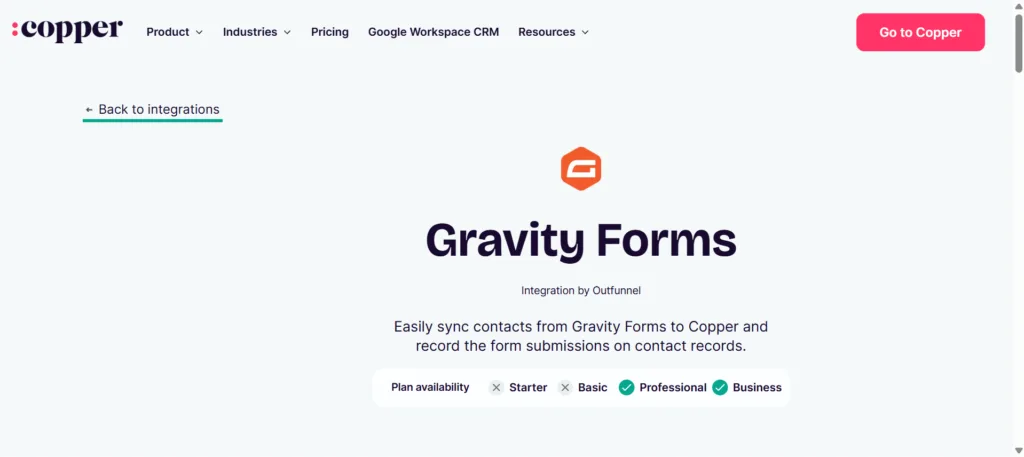
No. Copper lists the Gravity Forms connector in its marketplace, but the page labels it “Integration by Outfunnel” and sends users to Outfunnel for support. Copper approves and surfaces the integration; Outfunnel develops, operates, and bills for it.
How the Outfunnel integration works
When someone submits a Gravity Form, Outfunnel creates a contact in Copper. If a contact with the same email address already exists, Outfunnel records the new submission against that contact rather than creating a duplicate.
Outfunnel documents these additional capabilities:
- Map form fields to Copper fields.
- Log form submissions on Copper contact timelines.
- Show sync status and problems that block a record from syncing.
- Capture landing-page, referrer, and UTM details.
- Track website visits before and after a submission.
- Calculate lead scores.
These features make Outfunnel more than a form-to-CRM connector. They add marketing and website context that helps a sales team see where a lead came from and what the lead did after submitting.
Outfunnel pricing
Outfunnel is billed separately from Copper. Its pricing page showed these starting prices when reviewed:
- Basic: from $59 per month for 500 active contacts.
- Professional: from $99 per month for 1,000 active contacts.
- Scale: from $299 per month for 15,000 or more active contacts, billed annually.
An active contact is counted when the person is part of an active sync, has email or web engagement recorded, visits the tracked website, or receives a lead score during the billing period. The tier you need depends on activity, not on the total number of records stored in Copper.
Sources: Copper marketplace listing | Outfunnel integration page | Outfunnel pricing
Method 2: The Gravity Extra Copper CRM add-on
Gravity Extra sells a WordPress add-on built specifically to connect Gravity Forms with Copper CRM. It runs on the WordPress site, connects through Copper’s API, and uses one-time site-based pricing instead of active-contact pricing.
What the Gravity Extra add-on supports
According to its product documentation, the add-on can:
- Connect Gravity Forms with Copper through the API.
- Create multiple feeds.
- Select a target Copper module.
- Map standard and custom fields.
- Apply conditional logic.
- Process matching submissions automatically.
This is a focused connector, not a general automation platform.
Gravity Extra pricing
The product page showed these one-time promotional prices when reviewed in July 2026:
| License | Displayed price | Regular price shown |
|---|---|---|
| 1 site | $29 | $49 |
| 5 sites | $59 | $129 |
| 10 sites | $129 | $229 |
The vendor describes the purchase as a one-time payment. Promotional prices and support terms change, so confirm the checkout page before buying.
Sources: Gravity Extra product page | Gravity Extra documentation
Method 3: Bit Integrations – Most Affordable with Higher Possibilities
Bit Integrations runs entirely inside the WordPress dashboard, so no external server sits between the form and Copper. When a visitor submits the connected Gravity Form, the plugin sends the mapped data to Copper’s API and creates the record type you selected: a Company, Person, Opportunity, or Task.
A visual field-mapping panel pairs each form field with a Copper field, and you can map more fields, including Copper custom fields, by adding rows.
Beyond the core mapping, the Copper action supports:
- Assigning an owner to the new record with the Add Owner option.
- Adding the record to a company and applying tags during creation.
- Conditional logic, so a submission reaches Copper only when it meets rules you set, for example, a specific country or plan selection.
- Custom values and webhooks for more advanced routing.
- A per-integration timeline that logs each run as a success or error for troubleshooting.
Because Bit Integrations authorizes with a Copper account email and API key, it needs a Copper plan that includes API access. It does not add its own web tracking, lead scoring, or attribution, which remain Outfunnel’s strengths.
The same Copper action also works with WPForms, Contact Form 7, Bit Form, Elementor, and WooCommerce. For the wider picture, see how to integrate Gravity Forms without upgrading your plan.
Bit Integrations also supports other WordPress triggers and more than hundreds of external destinations, from sending Gravity Forms entries to Google Sheets to Gravity Forms email marketing integrations, so it doubles as a general automation layer for the site.
Bit Integrations pricing
| Plan | Displayed price | License | Billing |
|---|---|---|---|
| Starter Annual | $35 | 1 site | Yearly |
| Starter Lifetime | $99 | 1 site | One time |
| Agency Annual | $99 | Unlimited sites | Yearly |
| Agency Lifetime | $299 | Unlimited sites | One time |
The plans include field mapping, conditional logic, custom values, webhooks, and unlimited data transfers from the plugin. Copper’s own contact limits and API restrictions still apply.
Bit Integrations authorizes with a Copper account email and API key, which is why it needs a plan that includes API access.
Sources: Bit Integrations Copper docs | Gravity Forms to Copper page | Bit Integrations pricing
Which method should you choose?
There is no single right answer for every team. Match the method to the outcome you need:
- Choose Outfunnel when you want contacts matched by email, submissions logged on Copper timelines, and website visits or lead scores added to the CRM.
- Choose Gravity Extra when you want one dedicated connection for this single workflow and prefer a one-time, site-based purchase.
- Choose Bit Integrations when you need to create People/Contact, Companies, Opportunities, or Tasks, or when you expect to connect other WordPress plugins and services later.
The connector price is not the total cost
The connector is only one line on the invoice. The Outfunnel route needs an eligible Copper Professional or Business subscription plus a separate Outfunnel subscription.
Gravity Extra and Bit Integrations skip Outfunnel but still need Copper API access, which is limited to the trial, professional, and business plans. For teams with several Copper users, the CRM subscription can cost more than the connector itself.
How to connect Gravity Forms to Copper CRM with Bit Integrations Step-by-step guide
We tested the workflow below using fictional form data.
| Test item | Configuration |
|---|---|
| WordPress trigger | Gravity Forms submission |
| Copper action | Create Person |
| Copper account | Business-plan trial |
| Authentication | Copper account email and API key |
| Result | Person created successfully and verified in Copper |
Scope of this test
The test covers a “Create Person” workflow. It does not test duplicate updating, Create Opportunity, Create Task, retry behavior, or every field type.
Test form fields
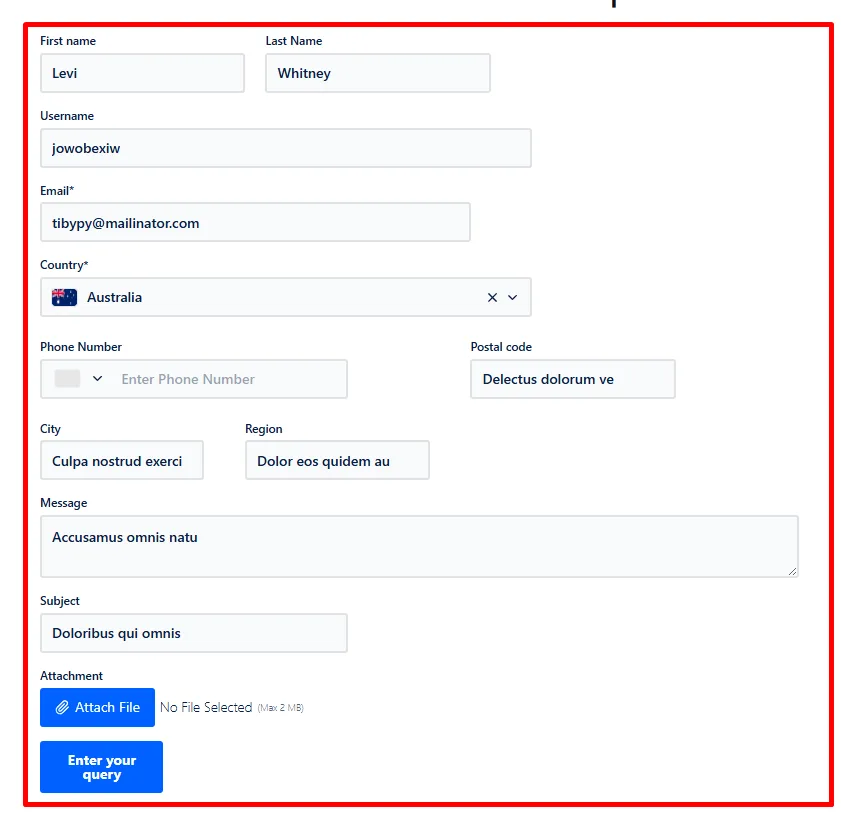
The Gravity Form contained these fields: First name, Last name, Username, Email, Country, Phone number, Postal code, City, Region, Message, Subject, and Attachment. Only the fields selected in the Bit Integrations field map were sent to Copper.
Step 1: Create a new Bit Integrations workflow
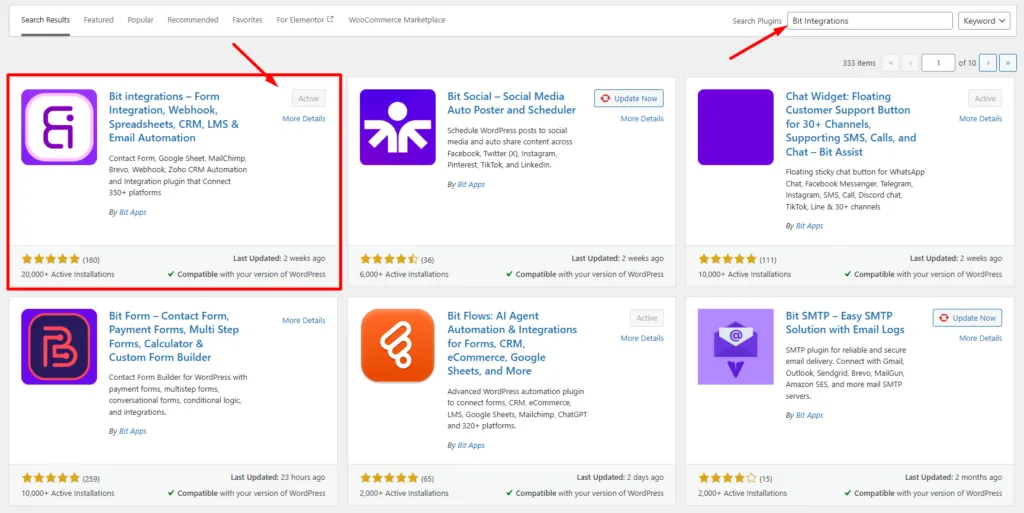
Install and activate Bit Integrations on the same WordPress site that runs Gravity Forms. Open Bit Integrations from the WordPress dashboard and select Create Integration.
Step 2: Select Gravity Forms as the trigger
Search for Gravity Forms on the trigger screen and select it.

Step 3: Choose the Gravity Form
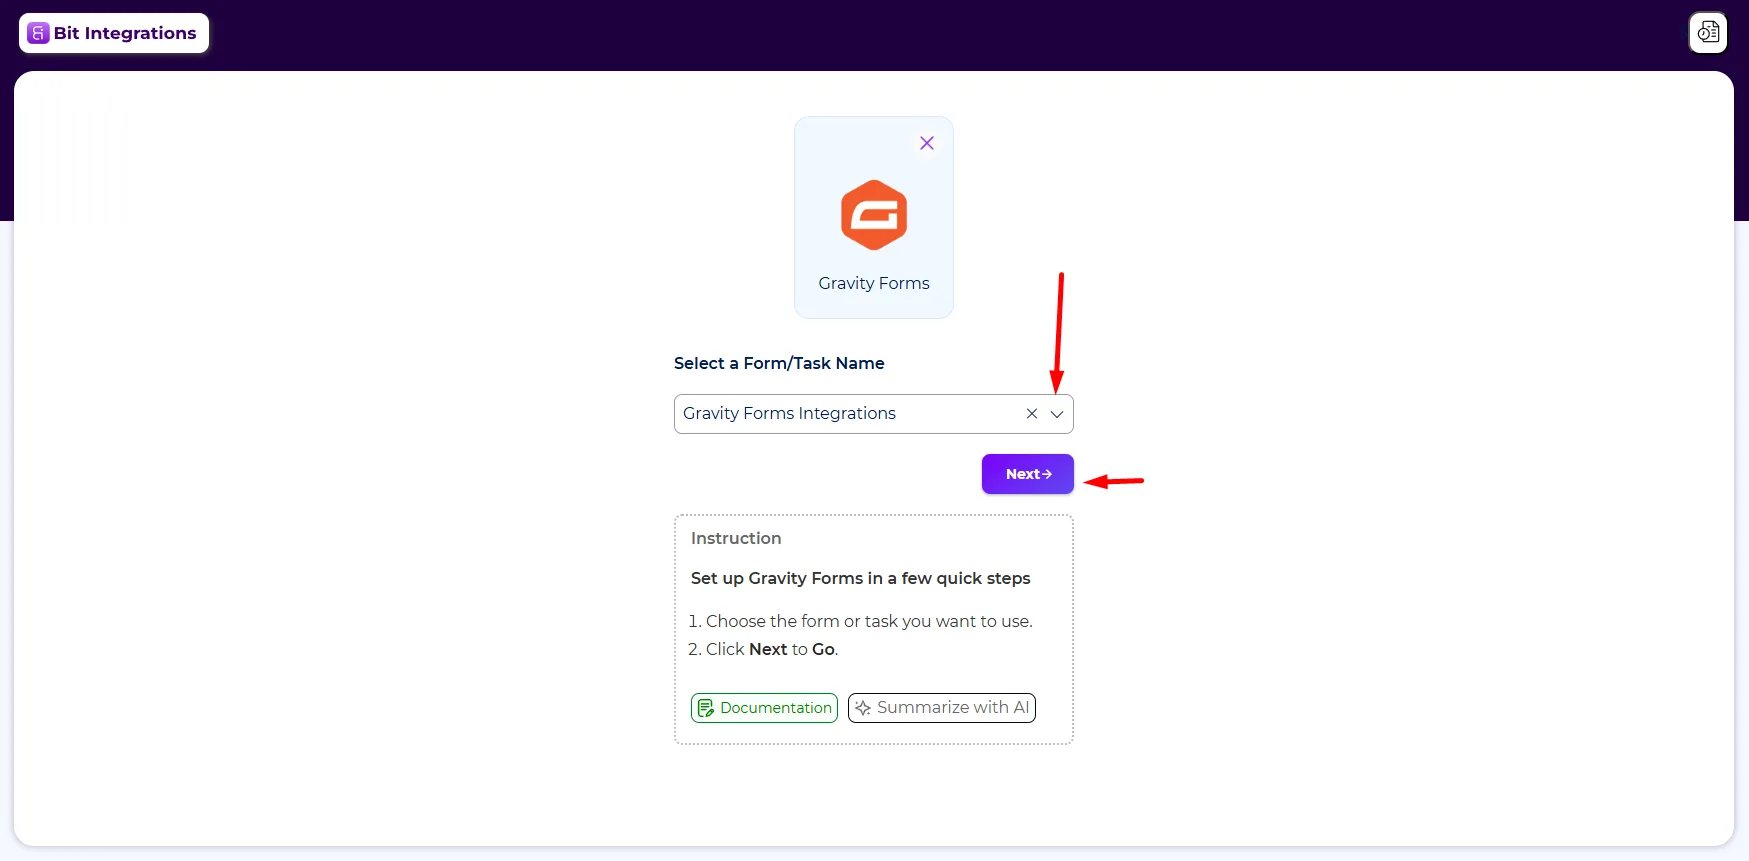
Open the form dropdown and choose the form that should send data to Copper CRM. In this test, the selected form was named “Gravity Forms Integrations.” Click Next.
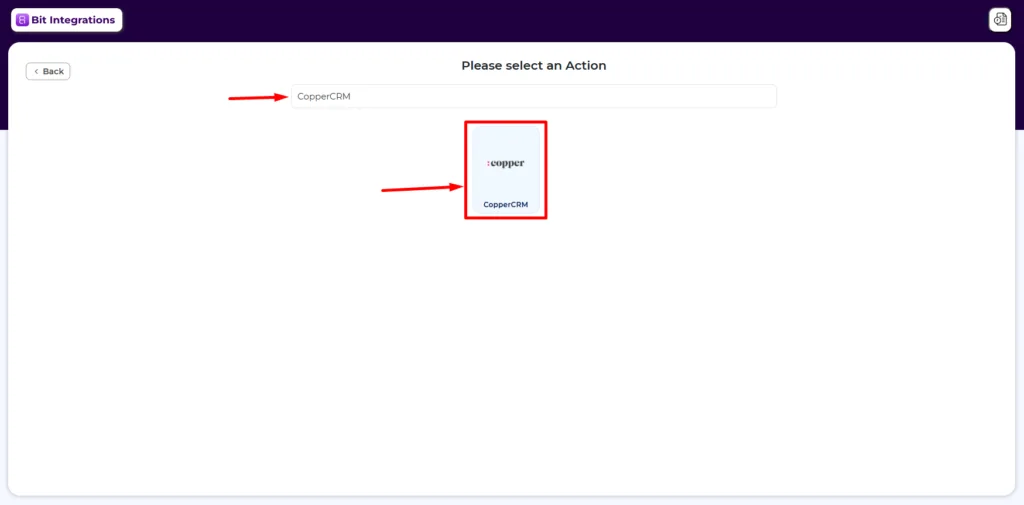
Step 4: Select Copper CRM as the action
Search for Copper CRM on the action screen and select the Copper CRM card.
Step 5: Enter the Copper API credentials
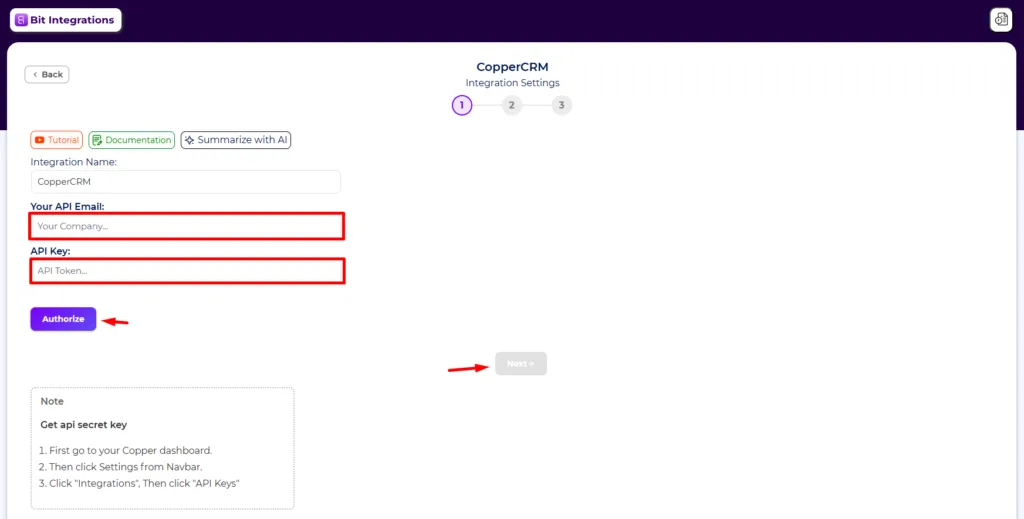
Bit Integrations needs the email address tied to the Copper account and a Copper API key. Enter both values and click Authorize. The Next button becomes available after successful authorization.
Security note
Treat the API key like a password. Do not expose it in a public screenshot, video, support ticket, or shared document.
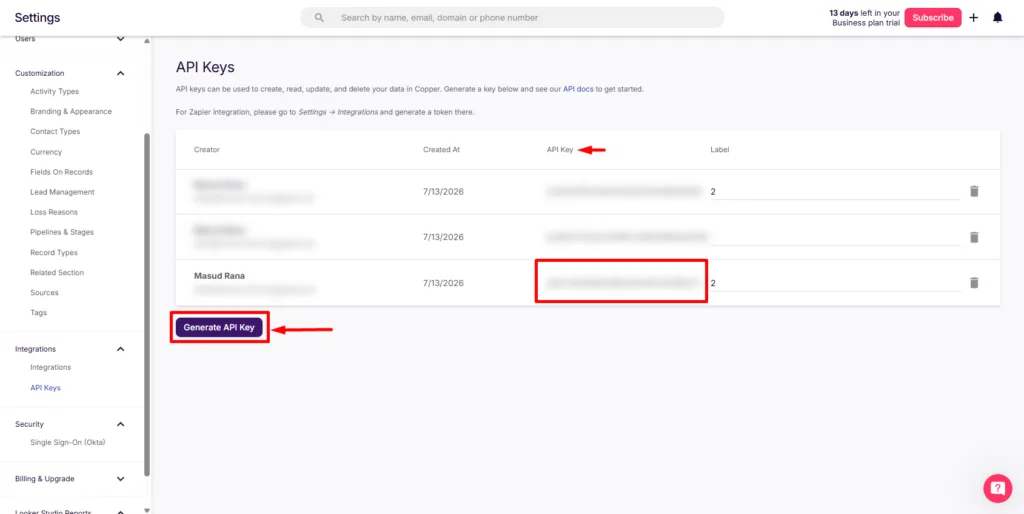
Don’t know how to find the Copper API key? Just follow these steps:
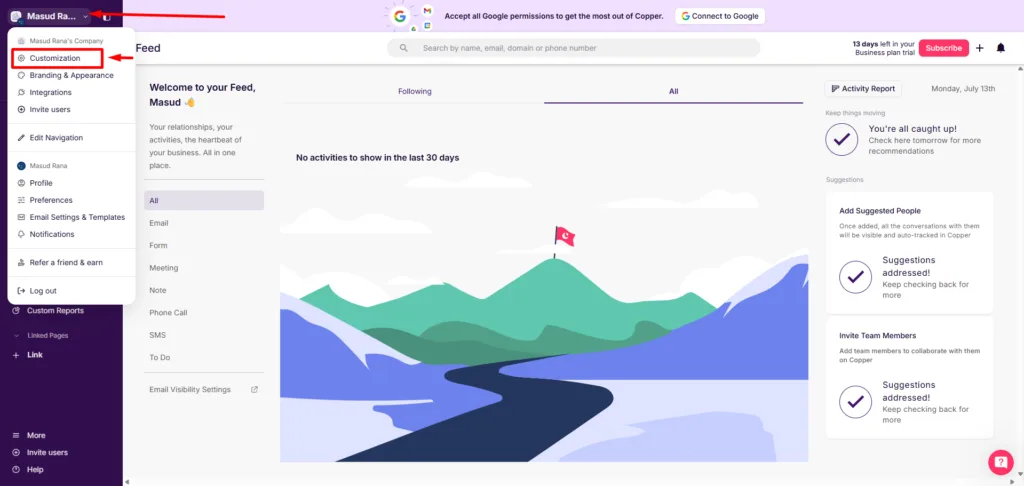
In Copper, open the account menu in the upper-left corner and select Customization.
In the Copper settings sidebar, find the Integrations section and select API Keys. An administrator may be required to access or generate API credentials, and Copper limits API availability by plan.
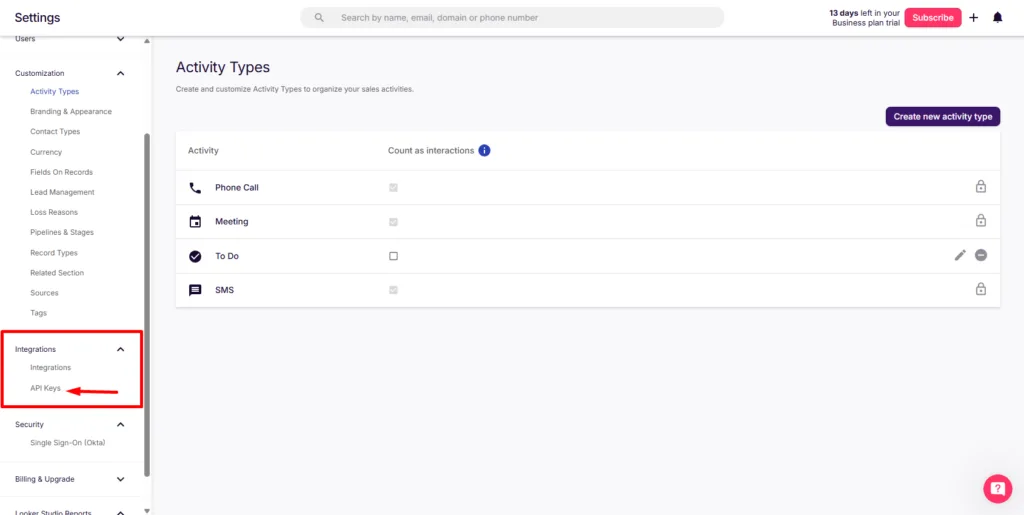
Click Generate API Key. Copper creates a key and shows it in the API Key column. Add a clear label so the purpose is easy to identify later, such as “WordPress Gravity Forms Integration.”
Copy the key and return to Bit Integrations. Do not reuse the key in unrelated tools, and revoke it if it is ever exposed.
Step 6: Select Create Person and map the fields
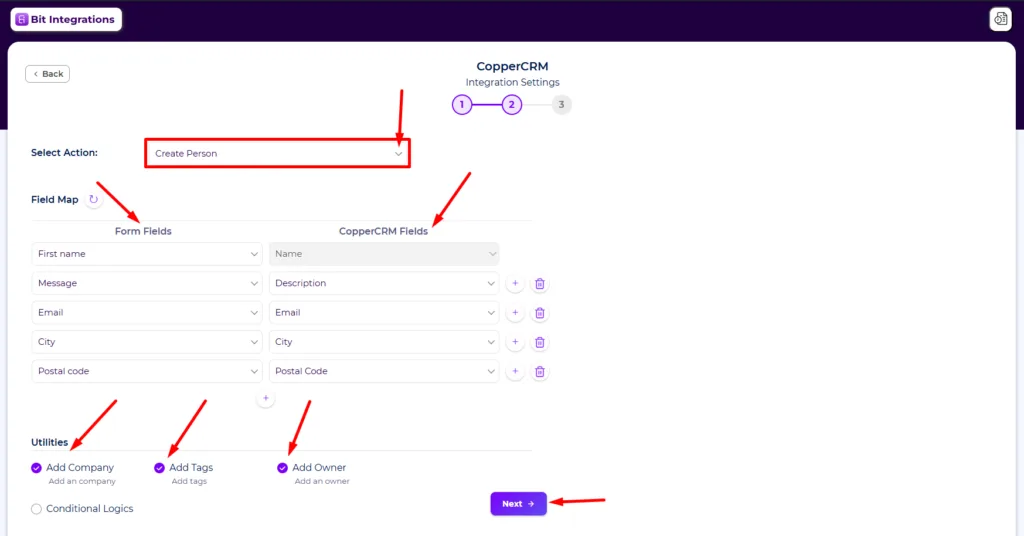
After authorization, select Create Person from the action dropdown. The goal of this test was to turn each qualifying Gravity Forms submission into a new Person record in Copper.
Now map the fields, First name to Name, Message to Description, Email to Email, City to City, and Postal code to Postal Code. The Add Company, Add Tags, and Add Owner utilities were turned on, and conditional logic was available but left off.
The remaining fields, Username, Country, Region, Subject, and Attachment, were not mapped, so they did not appear in the resulting record. After reviewing the mapping, click Next and save the integration.
Step 7: Submit a test entry
Open the form on the website and submit fictional test data. Testing with non-sensitive information confirms the mapping without adding a real customer to the CRM.
Step 8: Check the Bit Integrations log
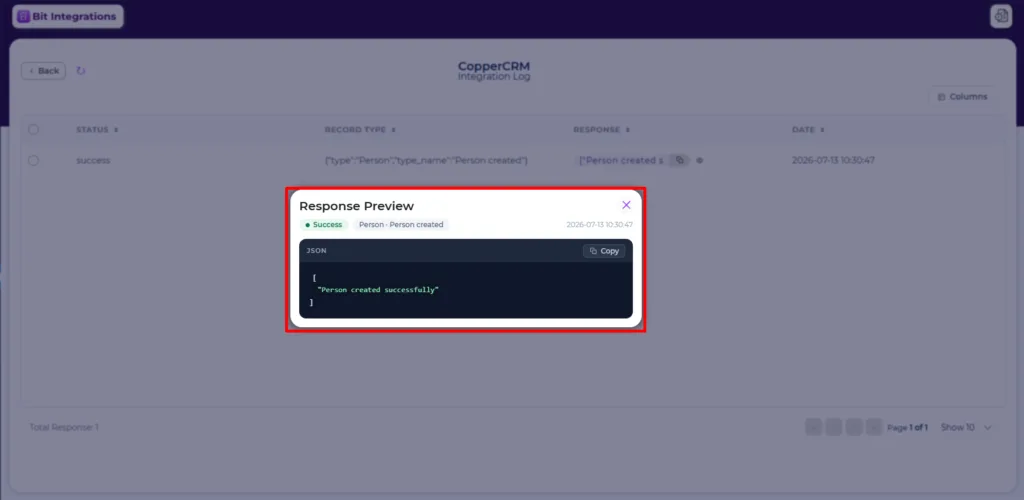
Open the integration timeline after submitting the form. The test log returned Status: Success, Record type: Person, and the response “Person created successfully.”
The timeline helps identify authorization, mapping, or API problems, but a successful API response should still be followed by a manual check in Copper.
Step 9: Verify the Person in Copper CRM
Open People in Copper and locate the new record. The test confirmed that Copper received the mapped name and email, as well as the selected company and owner.
The Gravity Forms trigger, Create Person action, field mapping, company assignment, owner assignment, and success log all worked in the tested environment.
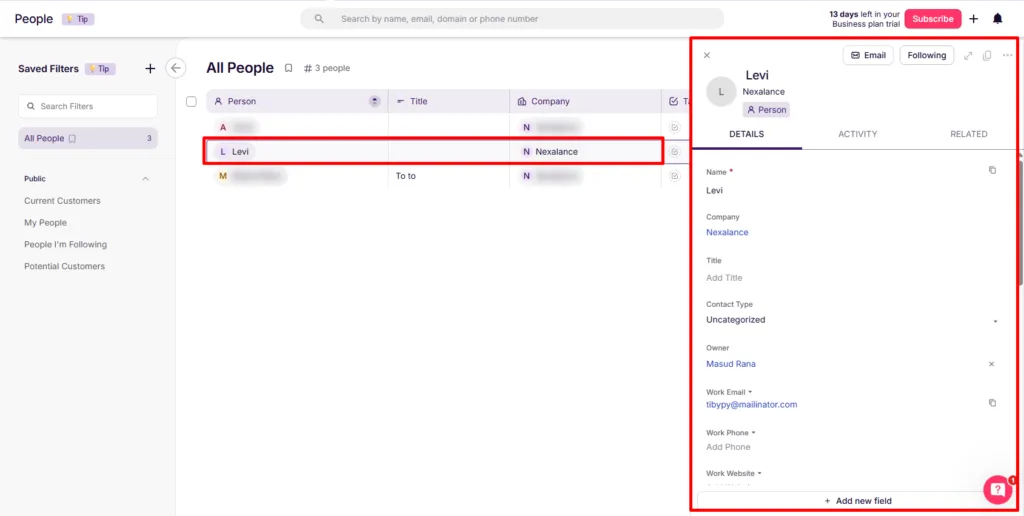
What the test confirmed
- Only mapped fields reached Copper.
- Mapping only the first name produced a first-name-only Person record.
- The Company and Owner utilities populated the related Copper fields.
- Bit Integrations recorded the API response in its WordPress timeline.
- A successful log still needed a final manual check inside Copper.
- The test verified record creation, not duplicate-contact updating.
Common setup mistakes
Five errors account for most failed or messy setups:
- Assuming Copper Basic includes API access. Confirm the account plan before buying a connector; see the plan requirement above.
- Publishing a partial API key in a screenshot. Blur the entire key, not part of it. A visible key can expose CRM data.
- Mapping only the first name. Copper requires a Name value for a Person, so map a complete name whenever possible.
- Mapping every form field by default. Send only the information the sales team uses. Extra data clutters records and adds privacy risk.
- Skipping the final Copper check. A successful response means Copper accepted the request, not that every field landed in the right place. Test with fictional data first.
Final recommendation
No method wins for every Copper user. Outfunnel fits when contact matching, website tracking, attribution, lead scoring, and submission history sit at the center of the sales process, provided the separate Outfunnel bill is acceptable.
Gravity Extra fits a site that needs one dedicated connection at a one-time cost. Bit Integrations fits sites that need several Copper record types or broader automation.
Before you commit, confirm three things:
- Your Copper plan includes the required integration or API access.
- The connector supports the Copper record type and behavior you need.
- The full cost fits your number of Copper users, WordPress sites, and active contacts.
Then submit fictional test data and verify both the integration log and the final Copper record before you send real leads.
Frequently Asked Questions about Gravity Forms Copper CRM integration
Does Copper include a Gravity Forms integration?
Copper lists the Gravity Forms integration in its marketplace, but Outfunnel develops and supports it. Copper Professional and Business plans can use the connector; the Outfunnel account and subscription are separate and are not included in the Copper price.
Which integration is the most affordable?
Bit Integrations is the most affordable overall, starting at $35 per year with unlimited integrations and flows. Gravity Extra can be suitable for a single dedicated connection, while Outfunnel starts at $29 per month and becomes more expensive as your active contact count increases.
Are there limits on integrations or automation flows?
Yes, depending on the tool. Outfunnel limits usage based on active contacts, while Gravity Extra focuses on individual add-ons and feeds. Bit Integrations allows unlimited integrations and automation flows without extra per-flow charges.
Can these tools create contacts and leads in Copper CRM?
Yes. Outfunnel can create and update contacts, while Gravity Extra supports records such as people, leads, and tasks. Bit Integrations can create people, companies, opportunities, and tasks in Copper CRM from Gravity Forms submissions.
Does Bit Integrations only connect Gravity Forms with Copper CRM?
No. Bit Integrations is not limited to a single connection. It can connect Gravity Forms, Copper CRM, and many other WordPress plugins, CRMs, marketing platforms, spreadsheets, and business tools from the same WordPress dashboard.
Do I need to buy additional add-ons for Bit Integrations?
Bit Integrations is designed to provide multiple integrations within one platform. This means you generally do not need to purchase a separate add-on each time you want to connect another supported app or WordPress plugin
Do I need to buy additional add-ons for Bit Integrations while connecting Gravity Forms to Copper CRM?
Bit Integrations is designed to provide multiple integrations within one platform. This means you do not need to purchase a separate add-on if you want to connect another supported app or WordPress plugin.
Can I map Gravity Forms fields to Copper custom fields in Bit Integrations?
Yes. The mapping panel lists Copper’s standard fields, and custom fields appear alongside them once they exist in Copper. Add rows to map more pairs. Create the Copper custom field first, since the panel can only target fields that already exist.
Which Copper user is the API key tied to, and does it need admin access?
The key is user-scoped. Every record the integration creates is attributed to the key’s owner in Copper’s audit log, so choose that user deliberately. Keys are generated under Settings, then Integrations, then API Keys, which usually requires an administrator.
What credentials does the integration send to Copper?
Copper’s API authenticates with a pair of values: the API key and the email address of the user who owns that key. Both are required, and a wrong or missing value returns an authorization error. That is why Bit Integrations asks for the account email as well as the key.
Are there Copper API rate limits that could affect a busy form?
Copper enforces per-key rate limits and returns an HTTP 429 response when they are exceeded. Recent developer guides cite roughly 600 requests per minute per key, with bulk endpoints limited further, though published figures vary, so check Copper’s developer documentation for the current number. Ordinary form-submission volume stays well below any of these limits.

Related Blog
Gravity Forms Trello Integration Without Gravity Forms Pro (Save $100+)
Top 10 ClickUp & Asana integrations for WordPress + Setup Guide


