

Zoom Integration in WordPress: Auto Register Attendees for Meetings and Webinars
If you run online classes, consultations, or webinars through WordPress, you already know how the manual side of it gets old fast. Someone signs up on a form or books a session, and you still have to go into Zoom and add them by hand.
This guide shows you how to connect Zoom Meetings and Zoom Webinar to any WordPress plugin using Bit Integrations. So every form submission, booking, or course enrollment automatically registers someone for a Zoom Meeting or a Zoom Webinar. No code, no manual copy-pasting between tabs.
Below you’ll find the full setup walkthrough with screenshots, a breakdown of when to use a Meeting versus a Webinar, and a look at some of the most common Zoom integrations WordPress site owners set up.
TL;DR:
What it does: Bit Integrations connects WordPress Plugins to Zoom, registering people for a Zoom Meeting or Zoom Webinar automatically when a form is submitted, an order is completed, a booking is made, or a course enrollment happens.
Zoom requirements: A Zoom Pro, Business, Education, or Enterprise account. Meeting registration is unavailable on the free Zoom Basic plan. The meeting ID must be set to Generate Automatically, and Registration must be set to Required.
Available actions: Create Attendee, Delete Attendee, Create User, and Delete User.
Setup time: About ten minutes for the first Zoom integration. Under three minutes for each one after that, because the Zoom app credentials are reused.
Meetings or webinars: Choose a Zoom Meeting when attendees need to speak. Choose a Zoom Webinar when attendees only need to watch. Zoom Webinars require a separate license.
Most common failure: Registration is not set to Required on the Zoom meeting, so Zoom has no registrant list to add anyone to.
What You Need Before You Start
Most of the requirements come from Zoom, not WordPress. Check these first:
- A Zoom Pro, Business, Education, or Enterprise account. Meeting registration is not available on the free Basic plan, and the host must hold a Zoom Workplace license.
- A meeting whose ID is set to Generate Automatically. Meetings using your Personal Meeting ID cannot use registration.
- A meeting that is not a No Fixed Time recurring meeting, which Zoom excludes from registration.
- A separate Zoom Webinars license if you are connecting webinars rather than meetings.
- The Bit Integrations plugin installed on WordPress, plus a trigger plugin that is already collecting the data you want to send.
Zoom documents all of the meeting requirements in its guide to scheduling a meeting with registration.
How to Set Up Zoom Integration in WordPress: Step-by-Step Setup
The process is identical for Meetings and Webinars. Only the action in Step 4 changes. Elementor Forms is the example trigger below, but the steps apply to any trigger plugin.
Note: For this Zoom integration, you will need a Zoom Pro account. You cannot create this integration using the free version.
Step 1: Install and Activate Bit Integrations
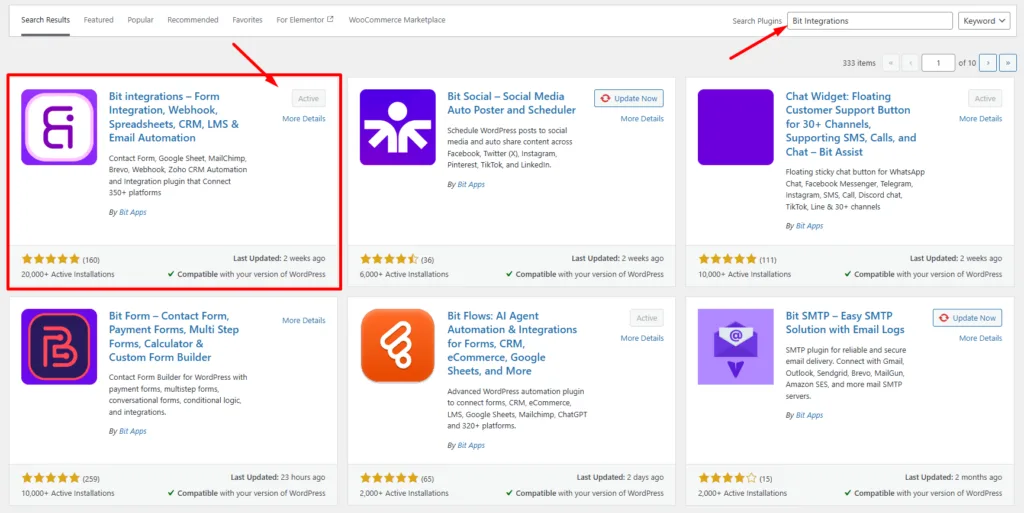
From your WordPress dashboard, go to Plugins, then Add New, search for Bit Integrations, and activate it. It is also available in the WordPress plugin repository.
Step 2: Create a New Integration
Open Bit Integrations from the dashboard and click Create Integration.

Step 3: Choose Your Trigger Plugin
Search the trigger list for the plugin that should start the automation, whether that is a form builder, an LMS, WooCommerce, or a booking plugin. You can see the full list on the All Integrations page.

For this example, we’re using Elementor Forms. After selecting the form, choose “Form Submission” and click “Fetch”. While the button is spinning, go submit a real test entry on the actual form on your site. Bit Integrations reads the fields from that submission, so don’t skip it.

Note: Not every trigger shows a Fetch button. Some plugins pass their fields through automatically.
Once your test submission is fetched, click Next.
Step 4: Select Zoom Meeting or Zoom Webinar as the Action
Search “Zoom” on the action screen and choose Zoom for a Meeting integration, or Zoom Webinar if you’re setting up a webinar. From this point on, the setup works the same for both.

Step 5: Create a Zoom App and Copy Your Credentials
Zoom authenticates through OAuth, so Bit Integrations needs a Client ID and Client Secret from an app on your own Zoom account.
Create that app once in the Zoom App Marketplace, choose General App as the type, paste in the Authorized Redirect URI shown on the setup screen, add the required scopes, then copy both credentials into the plugin. Every Zoom integration you build afterwards reuses the same app.
The exact scope list and the screen-by-screen walkthrough live in the documentation: Zoom Meeting integration setup or Zoom Webinar integration setup.
Step 6: Authorize Zoom Inside Bit Integrations
Paste the Client ID and Client Secret into the setup screen and click Authorize. Once the button reads Authorized, click Next.

Step 7: Map Your Fields and Choose an Action
Pick the meeting or webinar from the All Meetings dropdown, then choose what should happen to the person:
| Action | What it does |
|---|---|
| Create Attendee | Registers the person for the selected meeting or webinar |
| Delete Attendee | Removes a registrant, useful for cancellations and refunds |
| Create User | Adds a user to your Zoom account |
| Delete User | Removes a user from your Zoom account |
Map First Name, Last Name, and Email to the matching Zoom fields, then click Next. To run the automation only in certain cases, such as one product or course, add rules under Conditional Logic. Otherwise, click Save & Finish, and the integration is live.

Popular Zoom Integrations with WordPress
These are the pairings WordPress site owners build most often.
| Trigger plugin | Trigger event | Zoom action | Typical use |
|---|---|---|---|
| WooCommerce Bookings | A booking is created | Create Attendee | Paid consultations and coaching slots |
| WooCommerce | An order is completed | Create Attendee | Selling seats to a virtual event |
| Tutor LMS | A student enrolls in a course | Create Attendee | Live class access on enrollment |
| Dokan | A vendor product is purchased | Create Attendee | Sessions run by marketplace vendors |
| Contact Form 7 | A form is submitted | Create Attendee (Webinar) | Webinar and consultation signups |
You can explore more from:
Zoom Meeting vs. Zoom Webinar: Which One Do You Need
Both connect to WordPress the same way and use the same setup steps. The difference is what attendees can do once they join, and what Zoom charges you for. Use the comparison below to pick the right one before you build the integration.
| Feature | Zoom Meeting | Zoom Webinar |
|---|---|---|
| Attendee interaction | Camera, microphone, and screen share | View only, with chat and Q&A |
| Best for | Coaching calls, consultations, small classes | Public trainings, product launches, large events |
| Capacity | 100 on Pro, 300 on Business, 500 on Enterprise, higher with the Large Meeting add-on | Tiers from 500 up to 50,000 attendees, with single-use packages beyond that |
| License | Included with any paid Zoom plan | Separate Zoom Webinars license, priced by capacity |
| Action name in Bit Integrations | Zoom Meeting | Zoom Webinar |
The short version: choose Zoom Meetings when attendees need to speak, and Zoom Webinars when they only need to watch.
What This Integration Does Not Do
Bit Integrations registers people for Zoom sessions that already exist in your account. It does not create a new Zoom meeting from form data, so the meeting or webinar has to be scheduled in Zoom first, with registration enabled.
The four available actions are Create Attendee, Delete Attendee, Create User, and Delete User.
This suits recurring sessions well. Schedule the weekly class once, connect it, and every signup from then on registers itself.
Why Your Zoom Integration Is Not Adding Attendees
Almost every failed Zoom integration comes down to one of these five things, and the first one accounts for most of them.
| What you see | Cause | Fix |
|---|---|---|
| The integration runs, but nobody appears in Zoom | Registration is not set to Required on the meeting | Open the meeting in Zoom, tick Required under Registration, and save |
| The Registration option is missing while scheduling | Free Basic plan, or Personal Meeting ID selected | Move to a licensed plan and set Meeting ID to Generate Automatically |
| The All Meetings dropdown is empty | The meeting list was pulled before the meeting existed | Click the refresh icon beside the dropdown |
| Authorization fails or loops back | The redirect URL in the Zoom app does not match | Recopy the Authorized Redirect URI from Bit Integrations into the Zoom app |
| Only some entries reach Zoom | A condition is filtering them out | Review the rules under Conditional Logic |
Wrapping Up
Connecting Zoom to WordPress turns registration into a background step. Once the trigger, action, and field mapping are saved, each form submission, order, booking, or course enrollment adds that person to the Zoom session without any further input.
Most of the constraints come from Zoom rather than from the plugin: a licensed account, a meeting ID generated automatically, and registration set to Required.
Confirm those three before anything else, then run one test submission and check that the registrant appears in the Zoom registrant list. That single check catches almost every configuration problem before a live session depends on it.
Frequently Asked Questions About Zoom Integrations
Can I auto-register people for Zoom Meetings from a WordPress form?
Yes. Once the integration is set up, any form submission that matches your conditions (if you’ve added any) automatically adds that person as a Zoom Meeting attendee.
Does Bit Integrations support Zoom Webinars as well as Meetings?
Yes. Both are available as separate actions inside the plugin, and the setup process is identical for each.
Do I need to know how to code to set this up?
No. Everything happens through the Bit Integrations dashboard using dropdowns, field mapping, and a guided setup flow.
Why isn’t my Zoom integration adding attendees?
The most common reason is that Registration isn’t set to required on the Zoom Meeting or Webinar itself. Check that setting in your Zoom account before troubleshooting anything else.
Do I need to redo the setup if I regenerate my Zoom Client Secret?
Yes. If you regenerate the Client Secret from the Zoom App Marketplace, the old one stops working immediately. You’ll need to copy the new secret and re-authorize the connection inside Bit Integrations, or the integration will fail silently until you do.
Can I automatically remove someone from a Zoom session if their booking or order gets canceled?
Yes, this is what the “Delete Attendee” action is for. You can set up a second automation triggered by a cancellation or refund event in your booking or WooCommerce plugin, using Delete Attendee as the action, so the person is automatically removed from the Zoom session when their order is canceled.
What’s the difference between the “Create Attendee” and “Create User” actions?
“Create Attendee” registers someone as a participant for a specific Zoom Meeting or Webinar. This is what most integrations use. “Create User” instead adds a brand new user to your Zoom account itself, which is a different use case, usually reserved for team or license management rather than event registration.
Can I connect more than one WordPress form to the same Zoom meeting?
Yes. You can create separate Bit Integrations automations, each with a different trigger form or plugin, and point all of them at the same Zoom Meeting or Webinar. Everyone who submits any of those forms gets registered for that one session.

Related Blog
WPForms Trello Integration for Free: Create Trello Cards Via Form Submissions
Free WPForms Mailchimp Integration: Connect WPForms Lite and Basic to Mailchimp